Your first sequence
This walkthrough renders two clips and checks the join between them. Keep the clips short and the resolution modest the first time.
1. Load the example workflow
Load examples/h3_story_studio.json from the node pack through ComfyUI's workflow loader. Then, in the loader nodes, select the H3 diffusion model, text encoder, video VAE, audio VAE and optional LoRA that exist on your installation. The model names in the example come from its original environment, and nothing is downloaded for you.
The red outlines
Until you pick models that you have installed, ComfyUI outlines the loader nodes in red. That is expected.
The example also contains an optional still-image subgraph (used to generate first and last frame guides). It may need an extra model, but you can ignore it for video-only work.
2. Understand the wiring
At its core the graph has three H3 Continuity nodes between ComfyUI's loaders and sampler:
flowchart LR
    subgraph loaders [Loaders]
        CLIP[Load CLIP]
        VAE[Load video VAE]
        AVAE[Load audio VAE]
        MODEL[Load model and LoRA] --> SIGMA[MiniMax H3 sigma shift]
    end
    STORY[H3 Story]:::opt -- story --> TL[H3 Timeline]
    CLIP --> TL
    VAE --> TL
    AVAE --> TL
    TL -- positive --> GUIDER[BasicGuider]
    TL -- seed --> NOISE[RandomNoise]
    TL -- latent --> SAMPLER[SamplerCustomAdvanced]
    SIGMA --> GUIDER
    SIGMA --> SCHED[BasicScheduler]
    GUIDER --> SAMPLER
    NOISE --> SAMPLER
    SCHED --> SAMPLER
    SAMPLER --> DEC[VAE Decode and Decode Audio]
    DEC --> SAVE[H3 Save Segment]
    SAMPLER -- latent --> SAVE
    TL -- segment --> SAVE
classDef opt stroke-dasharray: 4 3;- H3 Timeline takes the CLIP and the two VAEs, and outputs the prompt conditioning, the empty latent to sample, the seed and a
segmentdescribing what this run is. Each run renders the next clip that needs it. - The sampler section is ordinary ComfyUI: guider, scheduler, noise, sampler. The Timeline's
seedoutput feeds the noise. - H3 Save Segment stores the clip's video and its latents under
output/h3_sequences/<name>/so that the next clip can continue from them. When every clip is done it also writes the full video. - H3 Story is optional and only needed to write prompts with a model. Renders never wait for it.
3. Set the Timeline node
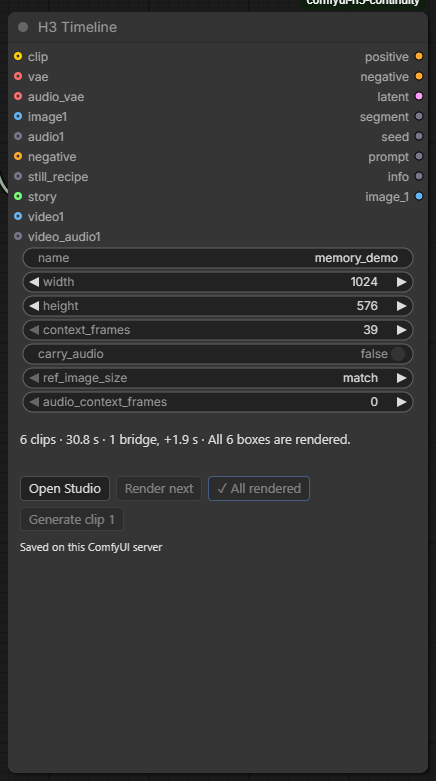
The node's own widgets control the whole sequence:
| Setting | What it does |
|---|---|
name |
The sequence folder under output/h3_sequences. Use a different name per project. |
width, height |
Output size, in multiples of 32. 1024 × 576 is a reasonable start. |
context_frames |
Frames each clip carries from the one before it: 39 (1.6 s), 90 (3.75 s) or 141 (5.9 s). |
carry_audio |
Also carry and freeze the matching audio. |
ref_image_size |
Reference image sizing, as in the native H3 Reference to Video node (match or max). |
audio_context_frames |
Incoming audio context in 24 fps frames; 0 follows the video context. |
The status line (for example 6 clips · 30.8 s · 1 bridge, +1.9 s · All 6 boxes are rendered.) and the Open Studio, Render next, Render N remaining and Generate clip N buttons sit underneath.
4. Draw the first two clips
- Press Open Studio on the Timeline node.
- Press + Clip in the Timeline toolbar at the bottom (or drag after the last clip to draw one). Write a prompt in the Prompt tab on the right.
- Add a second clip. In its Settings tab, leave the join on Continue so it carries the first clip's last frames, or tick Cut for a new camera angle. See Joins and bridges.
Everything you do in the Studio is saved in the Timeline node, so it saves with the workflow.
5. Render
- Render next renders the next clip that needs it.
- Render N remaining renders everything that is not current, in order.
- Generate clip N (in the clip panel) renders just that clip. The number beside it sets how many takes to make.
You can also queue the workflow with ComfyUI's own Run button; every queued run renders the next clip that needs it.
6. Inspect the join
Open the Viewer and play Clip 2 · active take, then Full video once both clips are done. If the join is not what you wanted, change the prompt, the seed or the join type, and render that clip again. The earlier render is kept as a take, so you lose nothing.
Start small
Short clips and enough GPU memory for your chosen model make the first loop fast. Generation quality and continuity vary with the model, inputs and settings, so inspect each join.